Cisco’s Webex provides a very nice desktop client that allows hosting meetings and sessions from our personal rooms. This works very well for sharing content and supporting web applications. It is easy to right click the desktop and ask for permission to control. However, if you need to type anything in an elevated command prompt or run anything that requires administrative approval, you are completely out of luck. Not only will you be prevented from entering data, you will also be prevented from clicking away from the protected item to do anything else. You are essentially locked in a digital prison and only the end user can free you by cancelling or clicking away from the protected action.
I knew there had to be a better way to help users. After all, I had been helped many times by vendors using Webex who were not hindered in this way. After some research and experimentation, I’m happy to report that we can easily use Webex support sessions to provide excellent administrative support for end user’s desktops.
The secret sauce to this is using the web based login to our Webex server. You cannot launch this type of session from the desktop client, or at least I’ve not yet found a way.
To get started, browse to https://hcc.webex.com and log in with your account. Once logged in, click “Webex Support” in the lower left hand corner of the screen. This did not seem intuitive to me. It felt like I was asking for support. Later I realized that someone else on our staff might use the same link specifically because they was support. It appears to swing both ways.
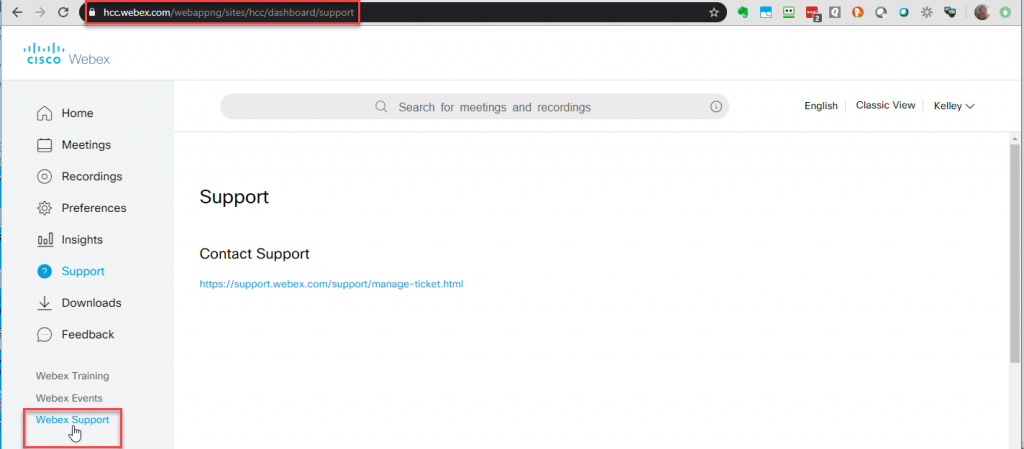
A list of support options will appear on the left side of your Webex screen.
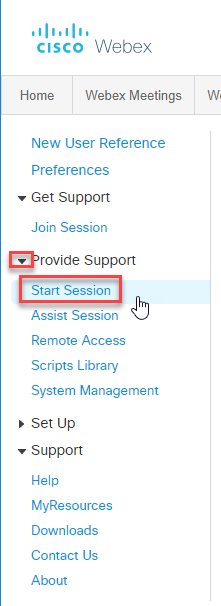
From the support page, if the “Provide Support” area is not already expanded, click the arrow just to the left to expand options.
Next, click “Start Session”. This will launch the “Customer Service Representative Dashboard”, aka CSR Dashboard. The dashboard consists of one or more blocks of controls that can be collapsed, expanded and moved from one place on your desktop to another.
If you have any difficulty getting the CSR Dashboard launched, you can click on the “Downloads” link. From here you can download the dashboard bits for your operating system.
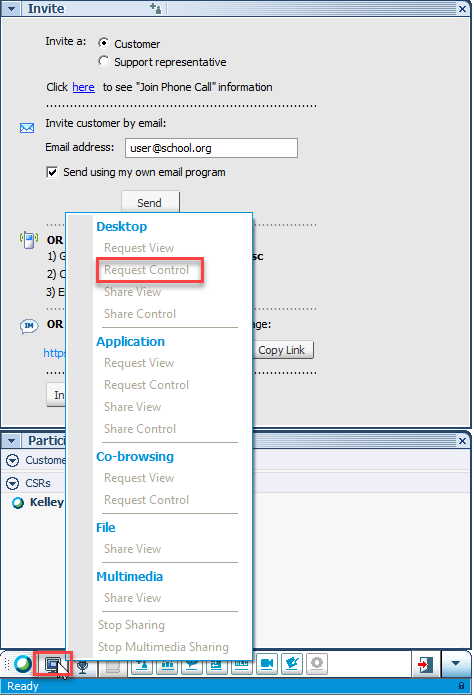
When the session is started, the CSR dashboard appears in the lower right hand of your screen. By default, two collapsible panels are open, the Invite panel and the Participants panel. You can enter an email for your customer and if “Send using my own email program” is ticked, an email will open with the link info required. Just send the email. Alternatively, if you are communicating with the client via an instant messaging app, just click the “Copy Link” button and paste the link to the chat window.
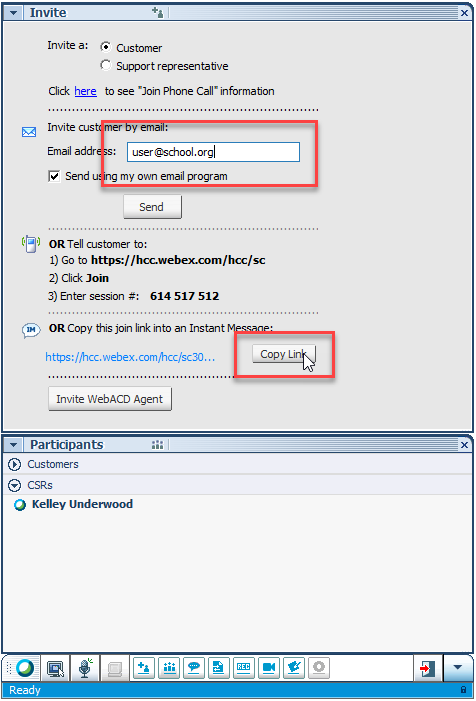
Once your client has accepted the invitation and joined the meeting, their name will appear in the “Participants” panel. You can then click the circled button in the dashboard to “Request Control” of the user’s desktop. Notice that for the image below, I do not actually have a user connected and that is why the various options are shown in gray. When the user connects, the options will be visible and clickable.
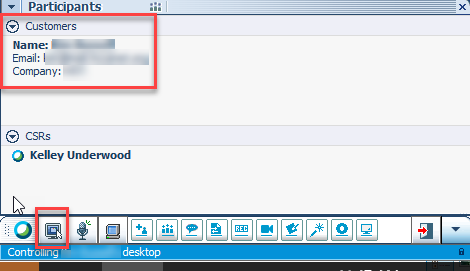
In figure five below, you can see how a connected customer appears in the dashboard. For reference, notice the “opening door” icon with the red arrow near the right hand side. Clicking that icon will end your support session. You’ll be given an opportunity to enter notes about the support case before it closes completely.
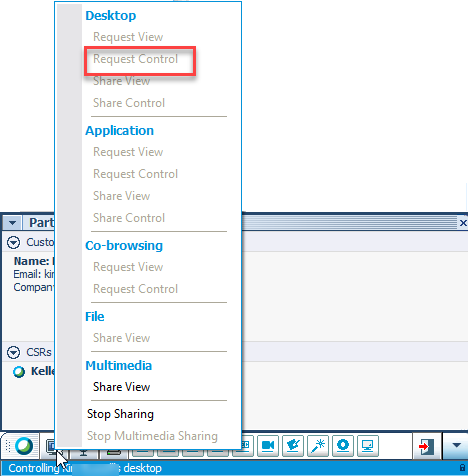
Not only can you request control, but you can also choose the more restrictive, “Request View” option. You can do the same for specific applications. Co-browsing is available where you can easily switch sides with the client, where they can perform some action on your computer. File and multimedia options are also included.
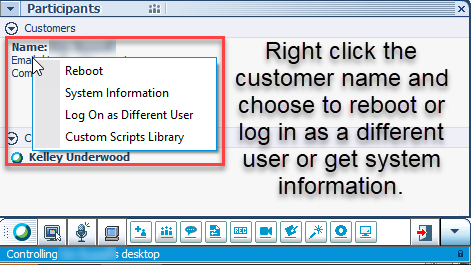
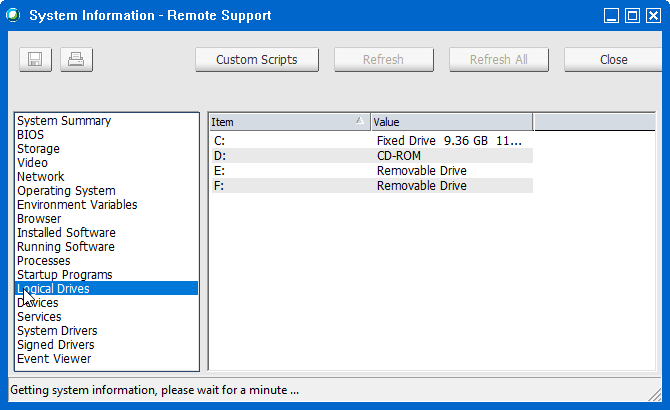
Sometimes you may need more access to the system than the client’s login allows. By right-clicking the customer name in the Participant’s panel, you can choose some advanced options. If you choose “Log On as Different User”, the current user will be logged off and you can provide administrative credentials for a new login. Your session will not be interrupted. If you choose the “Reboot” option, the other side will reboot. It does require approval, but since you are controlling the other side, you can grant your own approval if needed. The customer will need to reconnect to your session after the reboot. You can choose to run custom scripts once you’ve created the scripts in your Webex login. If you click “System Information” and if the customer approves, a popup will appear with a great deal of information about the remote computer. This info is shown in figure 7.
The image below shows the type of information you can retrieve from the customers computer. Click any item in the left pane to view the related info in the right. Below you can see the logical drives present on the customer’s computer.
One last thing that you may find as helpful as I. When you get control of your customer’s computer, it will appear in full screen. This is handy if you want to use keyboard shortcuts to interact with the remote screen. However, if you need to refer back to your own desktop or web browser to provide assistance, it is at first blush, difficult to get access to your screen. For example, using the Alt-Tab key combination actually impacts the remote side and not your local screen.
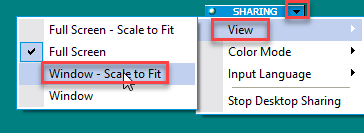
Do not fear, there is a simple work around. In the upper right corner of the remote computer is a “Sharing” icon. Click the down arrow and then “View”. If you choose “Window-Scale to Fit”, the remote session will be reduced just enough to make your local computer’s Task-Bar visible. You can now open and select your local apps to perform a task or to gather information to assist you in your support session.
This little tutorial is intended to just get you started with the more advanced support options available in Webex. You will want to experiment with the other icons/options available from the dashboard. I found myself well able to assist a customer with little more info than what I’ve shared above. I am now convinced that while connecting with Webex is a little more involved than with TeamViewer, the range of options are more extensive in Webex. Below will be a few links to helpful Cisco documents about support connections with Webex.
Get Started With Cisco Webex Support
Start a Session and Invite Customers or Other Attendees in Cisco Webex Support
Join a Cisco Webex Support Session
